S♥NEISM Soshi Designs

Moosick posted on Apr 30, 2012 at 03:08AM
Are you having one of those slow boring days? Why not have fun by making a banner for the club? :) This is where you can submit banners and icons for the club. I will be giving you tips and links to virus free sites where you can download photo editing tools and gadgets! If you have any suggestions for free editing sites or anything like that please post the link to the site and I'll update the list!

Free Editing Sites: linklinklink
Free Font Sites: linklink

Here are some more advanced photo editing programs you can download.

Photoshop: link

Photofiltre: link

Are you having trouble downloading fonts, photoshop, photofiltre, or moving your newly downloaded fonts to your font folder? Here are some amazing youtube tutorials that go step by step!

Tutorials: linklinklinklinklink
last edited on May 15, 2012 at 01:17AM

S♥NEISM 10 balasa

Click here to write a response...
lebih dari setahun yang lalu Moosick said…
My first try at making a banner and I failed. ~_~ Anywho, here is a Tiffany Banner! If you have a club dedicated to Fany feel free to use it! ^-^ Please do comment or atleast credit if used. Thanks!
last edited lebih dari setahun yang lalu
 My first try at making a banner and I failed. ~_~ Anywho, here is a Tiffany Banner! If anda have a clu
lebih dari setahun yang lalu MoOoOoN said…
@Moosick . I Downlouded Photoshop,can i know what can i do useing it??
is it only 4 banners??
BTW..i like ur banner
lebih dari setahun yang lalu Moosick said…
big smile
@MoOoOoN Thanks! :) You can pretty much do anything and everything with photoshop! You can make moving pictures (GIF's), you can make icons, banners, advanced edits, or even simple edits. When I first downloaded photoshop I started to looking at diffrent tutorials on youtube which really helped me out alot. What are you wanting to make? :)
lebih dari setahun yang lalu ary_aunova said…
heart
Woah~!! Moosick, this is great!! Your banner is awesome!! Can you teach me too how to make a banner?
lebih dari setahun yang lalu Moosick said…
big smile
@ary_aunova Thanks Ary, that means alot to me! ^-^ I'm actually working on a tutorial for banner making. It should be up in a couple of days! :)
lebih dari setahun yang lalu MoOoOoN said…
well i wanna make Gif pic& also edit pic like this beautiful pic we can found in tumblr , is this possible here?
&do u know how??cuz i couldnot do any thing when i opened it.
lebih dari setahun yang lalu Moosick said…
@ary_aunova Sorry but I won't be able to make my own banner tutorial this week. My schedule just got very busy. ,_, Before I thought that I would have time to make one but I can't. Luckily I know someone who already has an amazing step-by-step banner making tutorial. I will try to make my own tutorial eventually though! :) link


@MoOoOoN here is an easy tutorial on making GIF's! :) link

If you two have any questions feel free to ask! ^-^ I'll do my best to help you gals!
last edited lebih dari setahun yang lalu
lebih dari setahun yang lalu ary_aunova said…
heart
Thanks a lot, for the recommendation. Really appreciate that. But, still I will look forwrad your own tutorial. ^^ I already know how to make a GIF and I would like to know how to put texture on picture? Do you have any idea?
last edited lebih dari setahun yang lalu
lebih dari setahun yang lalu Moosick said…
@ary_aunova I just finished my texture tutorial for PhotoFiltre, I'll work on the one for Photoshop later.

Step-by-Step Tutorial 1; Adding Textures~

This is going to be my very first step-by-step tutorial! Please bare with me as we work together to learn about textures.

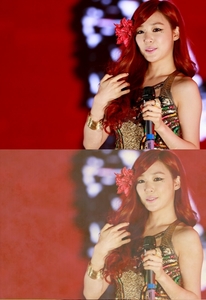
Step 1 (Finding The Picture); Finding the picture you'd like to edit can be hard at times. You must find a decent sized picture with good quality as well. I will be editing this picture of Tiffany --> link. If you are having trouble finding a picture to edit just for practice feel free to use my Tiffany photo.

Step 2 (Finding the Texture); The best place to find textures, brushes, actions, etc. would have to be link! For those who don't know what dA is; DeviantArt is an online community showcasing various forms of user-made artwork and has been up and running since August 7, 2000. Now that that's out of the way let's go ahead and look for our texture on dA. For now we are going to experiment with thislink. Once you go to the link and the texture pops up to the right you will see three options above the share options. 1) Add to Favourites 2) Download Image 3) Shop similar Prints; Go ahead and click the option Download Image. The full-sized image will pop up in a new tab, right click it and click save as. Once the image has been successfully saved open it up in PhotoFiltre as well as the photo you want to edit.

Step 3 (Adding the Texture); Now you are going to right click your texture > then click the 'Copy' option. Once you have copied your texture you'll switch over to the photo you want to edit and right click it > click the 'Paste' option> right click again and click the 'Paste options'. A small box will pop up with 'Paste options' at the very top followed by 'Opacity: 100%' with a bar with little markings under it. Now you will mess around with that option dragging the bar down to 'Opacity: 30%' or so; it's diffrent with each texture. The light textures you have to go down low on the 'Opacity' option while with the dark textures you barely have to go down on the 'Opacity' option. For my Tiffany picture I took the opacity down to 35% and hit 'Ok'. Before you hit 'Ok' all you see is the texture on-top of your photo, you can't see your picture at all. After hitting 'Ok' your texture will lighten up to where you can finally see your picture along with the texture. Sometimes you may not get the opacity right the first time so you have to right click your photo again and hit the 'Paste options' again and lower the opacity down some more. You can do this many times to see diffrent looks until you find the one you like best.

*TIP* Now sometimes your texture can be bigger or smaller than the photo you want to edit. Once you copy the texture and paste it onto your photo you can click the corners and drag them inward to make the texture smaller; and drag the corners outwards to make it bigger. OR if you'd like to just re-size your texture to fit your image you can do that.

There are many diffrent texture styles. You have all kinds of quotes (music, happiness, family, friends, etc), textures with diffrent colored streaks, light textures, dark textures, and even textures with diffrent sequin looking textures such as link one.


Here is my picture before & after!
last edited lebih dari setahun yang lalu
 @ary_aunova I just finished my texture tutorial for PhotoFiltre, I'll work on the one for Photoshop l
lebih dari setahun yang lalu Moosick said…
heart
Can someone tell me if my texture tutorial worked for them? I need some feed back please. ^_^

@ Here is a plain new Paparazzi Banner; Click for full size~
 Can someone tell me if my texture tutorial worked for them? I need some feed back please. ^_^ @ He